Video Recording
Introduction
Domestic camcorders can adjust themselves automatically to make very
good recordings, even in inexperienced hands. However, to achieve good
results it's helpful to understand a little about how the camera works
and how you can best use it within its limitations. The following notes
are intended to cover all the issues you'll need to understand.
 Video example (select to view):
Please note that at present this video is not online but can be viewed as part of a compilation of all this website's video clips at - http://youtu.be/jTCzxWt1RQk
Having trouble hearing the clip? Have a look at the help
page.
Sound
Choosing a location
The human ear and brain are excellent at pinpointing the directions from
which sounds are coming, isolating the sounds which are of interest and
ignoring other sounds such as traffic noise, other conversations and echoes
within a room. The camcorder is far less discerning, drawing in sound
from all around and appearing to amplify any unwanted noise. It is, therefore,
essential to:
- Choose a location which is free from unwanted noise such as traffic,
building work, sounds from nearby areas. When filming indoors, choose
a carpeted room with plenty of soft furnishings to cut down echoes and
be sure to close the windows.
Camera position when using the built-in microphone
The microphone should be as close to the source of sound as possible.
If you're using your camcorder's built-in microphone, the camcorder should
be placed as close to those speaking as possible.
- Press the zoom control to the W (or wide) position until the lens
has zoomed out fully to its widest angle of view. Position the camera
as close as possible to the subjects whilst making sure that everything
you want to see is included.
If the subject is a single person it is usually best to go no closer
than 1 or 1.5 metres and to zoom in a little, in order to get an undistorted
picture.
Picture
Illumination
- For filming, you should choose a well lit area - when indoors, either
a room with good artificial lighting or one with large windows.
The camera needs to be adjusted to the brightness of the subject it's
filming. Camcorders can be set to adjust themselves automatically - usually
known as automatic exposure - but this can cause problems, as described
below in the section on backgrounds.
Backgrounds
The human eye is much better than the camera at viewing scenes with strongly
contrasting brightness. For instance, you can stand in a room and see
a poster on an inside wall next to a window whilst at the same time being
able to see a tree outside the window. A video camera could be adjusted
to see the poster, but the outside world would be seen as a white blob,
or it could be adjusted to see the tree, but the poster and the inside
wall would be seen as black. If you try to film a person with light skin
against a dark background, the camera will adjust for the background and
the person may be too bright. Similarly, a dark skinned person against
a white background may appear too dark. The solution is to:
- Avoid bright or dark backgrounds and do not include lights or windows
in the picture.
You can judge the effect through the camera's viewfinder.
Many camcorders give you the option of manual exposure which will allow
you to compensate for the background.
Examples:
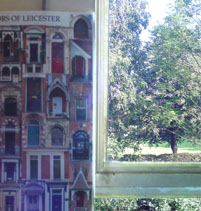 1. As seen by the human eye
 2.
Camera exposed for poster 2.
Camera exposed for poster
 3. Camera exposed for trees
Colours
Artificial light tends to be very orange compared to natural daylight.
Once again, the eye and brain cope with this well and we rarely notice
it, but for the video camera it is a problem. The white balance function
on camcorders allows them to compensate and usually has "indoor",
"outdoor", "auto" and manual settings. Although "auto"
is fallible it is probably best in most situations.
- Mixing artificial lighting with natural daylight gives strange colours.
This may not matter, depending on the intended use of your recording.
- Set the "White Balance" switch to "Auto" for most
applications.
When you're filming brightly coloured objects or when you simply want
to ensure the most accurate results you should avoid mixing artificial
light and daylight and you should set the white balance manually.
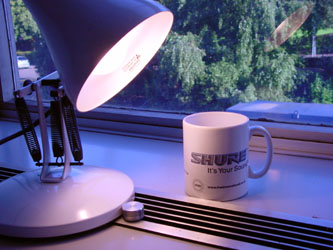
The mug in this image is white. The daylight from the window looks blue
in comparison to the artificial light from the desk lamp. The artificial
light looks orange in comparison to the daylight.
Focus
Camcorders have automatic focus but some also have the option of manual
focus. Automatic focus can cause problems by adjusting itself unexpectedly
and making your recordings look fuzzy. Manual focus will remain fixed
but needs to be set accurately.
- Use manual focus if you have the option. To set the focus, zoom the
lens in fully by holding the zoom switch in the T for Telephoto position.
Point the camcorder at the object you want in focus. Set the focus either
by adjusting the focus ring or by switching to auto focus until the
focus is set and then switching back to manual focus. Zoom out again
to set the lens to the composition you want.
Focus problems are often hard to spot with the low resolution viewfinders
on camcorders - especially with colour LCD screens. Auto focus will tend
to focus on the centre of the image while objects of interest - especially
people - are often at the sides of the shot. With manual focus you can
be confident that, as long as you don't move the camera nearer or further
away, your object of interest will stay in sharp focus.
Other tips
- If the interviewee is nervous, the interviewer should chat with
them while the camera operator sets up the equipment.
- Television and film documentary convention has interviewees looking
at the interviewer and not the camera, even if the interviewer cannot
be seen. Unless you deliberately want to break convention, you should
follow this approach. The interviewer should maintain eye contact and
look interested throughout the interview to prevent the interviewee
from looking at the camera.
- Mount the camcorder on a tripod to allow easy composition of shots
and to avoid shake and handling noise.
- It is quite possible to leave the camcorder unattended while making
your recordings, provided that you can be sure that subjects will not
stray out of shot.
- If a scene includes several people, position them as closely together
as is comfortable to allow the camcorder to be close and get good
sound.
- Make a trial recording and watch it back to make sure you can see
and hear everything properly.
- People who wish to remain anonymous can be hidden in editing but
it is far easier to deal with the situation while recording by positioning
them with their backs to the camera.
- Avoid using Long Play (LP) mode as this reduces quality and may
make your material difficult to play back on other machines.
|