UPDATED: 24 October 2005
![[The University of Leicester]](../images/unilogo.gif)
Note: Use of the basic templates assumes a degree of familiarity with Web design and CSS. It also assumes that you have already done core work on both a plan and possible design ideas for your site - see the Plan it and Design it sections in the Web Centre. If you feel confident that your site is well planned out and are looking to customise the basic template then the information in the following sections may be of use to you.
If you want to have a version of the University logo with a colour background that is not available via the logo repository then you need to contact the Web team and have one with your colour officially created from the master template. This version will also then be added to the others in the logo repository.
Colour changes to the University logo background should only be made by the Web team.
Note: Changing the header and footer bar background colours requires an understanding of Cascading Style Sheets (CSS).
Start by downloading the page template to your machine and then open it in Dreamweaver. In the 'design' window on the right hand side of your dreamweaver interface you'll see your CSS styles in a list. The section you are looking for is the one entitled 'headerfootercolours.css' (see image below).
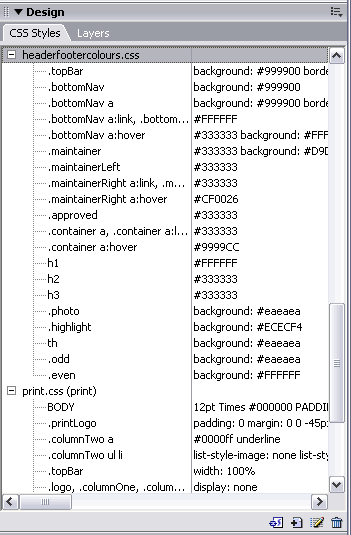
You'll need to edit the style(s) in this section to change the colour of the templates. You edit them by 'right-clicking' on them and choosing 'edit'. Which style controls which coloured section is explained clearly within the style sheet itself - but for clarity this information is summarised below:
This sets the colour of the bar that runs across the very top of the Web site
.topBar {background: #666666; border-bottom: solid 1px #FFFFFF;}
This sets the colour of the bar containing the bottom navigation
.bottomNav {background: #666666;}
This sets the colour of the five boxes
.bottomNav a {background: #666666; border: 1px solid #FFFFFF;}
This sets the colour of the text within the five boxes
.bottomNav a:link, .bottomNav a:visited, .bottomNav a:active {color: #FFFFFF;}
This sets the colour of the five boxes and text within, when the mouse is rolled over
.bottomNav a:hover {color: #333333; background: #FFFFFF;}
This sets the colour for the bar underneath the bottom navigation
.maintainer {background: #cccccc; color: #333333;}
This sets the colour of the text for the 'updated' date
.maintainerLeft {color: #333333;}
This sets the colour of the text for the maintainer text
.maintainerRight a:link, .maintainerRight a:visited, .maintainerRight a:active {color: #333333;}
This sets the colour of the text for the maintainer text, when the mouse is rolled over
.maintainerRight a:hover {color: #CF0026;}
This sets the colour of the approved text at the very bottom of the screen
.approved {color:#333333;}
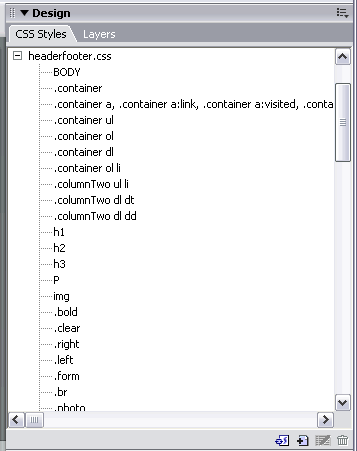
Other styles that you might want to alter, including H1, H2 and H3 are in a second style sheet called 'headerfooter.css'.
This sets the text size for the h1 text, main heading top right hand corner
h1 {font-size: 120%; text-align: right; font-weight: bold; padding: 32px 5px 0 0; margin: 0;}
This sets the style for the h2 page heading (which includes the coloured bar under the heading)
h2 {font-size: 100%; font-weight: bold; padding: 15px 10px 3px 0; margin: 20px 10px 20px 10px; border-bottom: 5px solid #999999;}
This sets the style for h3 sub-headings
h3 {font-size: 80%; font-weight: bold; padding: 10px 0 0 0; margin: 15px 10px 10px 10px; border-top: 1px solid #CCCCCC;}
A common thing that is requested is the addition of some kind of background image to the header bar on the right hand side. Often a photo of something relative to the site or a sub-brand of some kind. You will need to prepare this photo before hand within a graphics package - perhaps adding a fade effect so that it blends into the header bar. If you want help preparing an image for your header bar then contact the Web team. Any image used doesn't really need to be no bigger than 70 pixels vertically as the extra will not be visible. Some pictures make better backgrounds for text than others so care will need to be taken in choosing.
The style sheet that controls the header bar this is called 'headerfootercolours.css'.
The style that controls the header bar overall is called .topBar
All you need to do is 'edit' this style and add a Background image (see screengrab below).
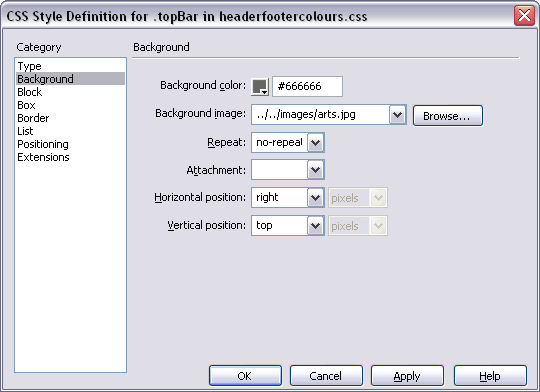
You will need to specify which image you want to use as a background - any image you use should really be located in your Web site's 'images' folder. The image should not 'repeat' so that setting needs to be set to 'no-repeat'. The horizontal position should be set to 'right' and the vertical position needs to be set to 'top'.